When you sign up for a 30-day free trial with Smartwaiver, the first thing we hope you’ll notice is that we’re here to help! Immediately after you choose your username, we'll prompt you to send us your waiver so we can quickly convert it into a digital smart waiver (usually done on the same business day).
The second thing we hope you'll notice is that you have the flexibility to make changes to that new smart waiver whenever you'd like. Below are 10 default settings that we don't touch when we create your first smart waiver, but that you may want to alter to match your business's workflow.
ON YOUR SMART WAIVER
1) Your Business Logo:
Default: Unless you specifically ask us to add your logo to your smart waiver, we’ll leave this blank.
Alternative: You can upload a JPG version of your logo to the header of your smart waiver.
To Change: From the Waiver Editor, go to: Header → Upload Your Logo
2) Participants Label
Default: Most businesses refer to customers signing their waiver as “participants”, so that’s the default descriptor that we use.
Alternative: You can label your customers however you’d like on the waiver (e.g: Jumpers, Surfers, Climbers, Racers, etc.).
To Change: From the Waiver Editor, go to: Participant Info → Participant Labels
3) Email Verification
Default: When a smart waiver is completed online, an email is sent to the participant asking them to verify their email address.
Alternative: If you'd rather not have participants verify their email address, you can disable this feature.
To Change: From the Waiver Editor, go to: Options → Emails → Uncheck the box (More)
4) Opt-in to Email Offers
Default: Most businesses like to capture their participants’ email address so an ‘Opt-in’ email address field is presented on your smart waiver by default.
Alternative: If you don’t want to display an “Opt-in” email field, you can disable this feature.
To Change: From the Waiver Editor, go to: Options → Emails → Uncheck the box
5) Email Field on a Kiosk Waiver:
Default: For waivers completed on a Kiosk at your location, the email field is presented (but not required)
Alternative: If you don’t want to display an email field on the Kiosk version of your waiver, you can remove it.
To Change: From the Waiver Editor, go to: Options → Kiosk → Uncheck the box
6) Background Colors:
Default: All waivers are built with a white background and grey borders.
Alternative: You can customize your waiver by choosing a preset color template or use whatever colors you’d like to match your brand.
To Change: From the Waiver Editor, go to: Colors → Choose a palate
WAIVER CONSOLE SETTINGS:
7) Expired Waivers:
Smartwaiver gives you the ability to specify when your signed waivers expire (if ever).
Default: An expiration date is not set on the smart waiver we convert.
Alternative: You can change your settings so that customer submitted waivers expire after a certain amount of time (from 1 month to 10 years) as well as from a specific date. When you set waivers to Expire those waivers will appear in your Waiver Console crossed out after the specified time.
To Change: Go to: Account Settings → Waiver Console → Waiver Console Settings → Choose the time period (More)
8) Timezone:
Default: All signed waivers displayed in your Waiver Console show the time they were submitted as Central Time.
Alternative: Choose from ANY time zone in the world.
To Change: Go to: Account Settings → Waiver Console → Waiver Console Settings → Choose your timezone
(Note: times will only change in the Waiver Console. All times are recorded in UTC on the signed PDF waiver)
9) Check-in:
The check-in tool is designed for businesses that need a quick and easy way to know how many customers are participating in their activities on a daily basis.
Default: Participants automatically show as “checked-in” when they sign from a Kiosk.
Alternative: If you’d rather manually check-in participants that sign from a Kiosk, (or not check them in at all) you can disable this feature.
To Change: Go to: Account Settings → Waiver Console → Waiver Console Settings → Uncheck the box (More)
ON THE APP
10) Kiosk App:
If you’re using the Smartwaiver Kiosk app, Auto Photo Capture allows you to take pictures of the participant signing the waiver which automatically gets attached to the PDF.
Default: Auto Photo Capture is set to ‘Off’ when you first log in to the app.
Alternative: Enable the Auto Photo Capture feature to 'On'.
To Change: When you launch the app, touch Settings → Turn Auto Photo Capture to 'On'.
These are just some of the customizable settings in Smartwaiver. If there's something else you need to change and you're not sure how to do it, just let us know!
One of the many benefits of using digital smart waivers is being able to show your customers that you're no longer operating in the past (using paper) and that you're hip to the ways of the future (going digital). Hand your customers a clipboard, paper and pen - you get funny looks and sneers. Direct them to a slick, modern, dedicated digital waiver signing station - you get approving nods and smiles (or at least not funny looks).
When you’re ready to set up your digital waiver Kiosk, Smartwaiver has a free app to use with an iPad. The app locks down the dedicated device so your customers can only access the waiver you want them to sign. Cover up the home button with a beautiful enclosure and you're all set!
But what if you don't have an iPad device and new hardware just isn't in the budget this year? No problem. You can still use Smartwaiver as a Kiosk - simply fire up that old, trusty laptop or computer that's been collecting dust in the storage room and use your waiver in a web browser.
Here's how:
Each time you create a new digital smart waiver in your account, two versions of the same waiver are created: (1) Web Version and (2) Kiosk Version. The only difference between the two is:
The Web Version: (placed on your website, or as a link in your emails)
The Kiosk Version: (used at your location)
When you download the free app on an iPad tablet, the Kiosk Version will automatically be displayed when you log in with your Username and Password.
When you use a computer (without the app), you need to copy/paste the Kiosk Version URL into the address bar of the browser.
How to Get Your Kiosk Version URL
Because you’re not using the app, your computer will not automatically be locked down. We therefore recommend using a nifty third party Google Chrome Kiosk extension.
Get Kiosk for Chrome Extension
This extension will completely lock down your machine and actually require you to restart the computer in order to exit the waiver. The extension also disables your device’s sleep mode so the waiver will always appear on the screen.
Simply open up the extension settings and enter your Kiosk Version URL:
That's it! You now have a Smartwaiver Kiosk running on your laptop or computer.
As always, let us know if you need any help setting things up or if you have any questions at all.
Important to note: Smartwaiver's patent-pending Auto Photo Capture feature will only work when using the Kiosk app on a tablet.
For many Smartwaiver customers, winter break is not really a break at all but one of the busiest times of the year; a time when vacationing kids and parents flock to activity-based businesses looking for fun things to do during their time off.
If you’re one of those businesses, be prepared for the influx of customers this holiday season with these Smartwaiver tips:
Put Your Waiver On The Interwebs

When you send out those promotional holiday emails, posts and tweets to your customers, don’t forget to include the link to your smart waiver. Your customers will appreciate being able to fill out their waiver ahead of time, and you’ll appreciate having the waiver on file when they get to your location. Simply look them up in your Waiver Console by last name, check them in and they’re off!
Add a Scannable Barcode

If you have a 2-D scanner handy at the front desk, speed up the check-in process by setting up a barcode on the confirmation email. Customers that sign the waiver from home can simply present the confirmation email on their smartphone when they arrive. Scan the barcode on the email and they’re automatically checked-in.
Add More Kiosks

Avoid the potential for long queues by setting up an extra kiosk or two in your lobby. If you have a spare tablet from home or even a laptop lying around in the back room, you can set them up with your smart waiver to help with the lines that might form during busy times.
Temporarily Upgrade Your Service Plan

If you’re getting close to your allotted signed waiver limit you can easily upgrade your plan at any time and then switch back to your old plan when things slow down. Your bill will be prorated when you move your plan up and down.
Here's to a busy, prosperous and streamlined holiday season for all!
If your business offers multiple activities, you might require customers to sign a waiver specific to the activity they’re participating in - which means you have multiple waiver templates to manage. One of the many benefits of turning your waiver into a smart waiver is the ability to create an unlimited number of waiver templates (which you can edit at any time). You can then display your multiple waivers on the same page on what we call a Waiver Index Page.
Setup in a Few Simple Steps
When creating your smart waiver, simply go to the Options tab in the waiver editing tool and place a check in the box under the Waiver Index Page dropdown. Give your waiver a descriptive title that customers will understand, select the position on the page where you’d like the waiver to appear…

and you’re all set!
Your Smartwaiver Kiosk
Now when you use the free Smartwaiver Kiosk app on your iPad your Waiver Index Page will automattically display all of the waivers you've selected to be on the page.

On The Web
Like each smart waiver you create, your Waiver Index Page has a unique URL. So if you want to show links to your waivers on one webpage, you can send out the URL to the Waiver Index Page. From here your customers can choose which waiver they need to complete.

You’ll find the URL in your Waiver Editor. Just click on the icon next to your waiver title and then copy and paste the URL from your address bar.

You can also choose to display your Waiver Index Page on your waiver widget.
Viewing The Signed Waiver
After a waiver is signed, you’ll see the title of the waiver in your Waiver Console under the Waiver Title. If multiple waiver templates have been signed you can narrow down a search for a waiver by using Filters.

You can also use waiver filters when exporting participant data and viewing your Smart Trends reports.

If you need help creating a Waiver Index Page, just let us know. We’ll get you set up quickly!
As a business owner or manager, you understand the importance of customer data. The more you know about your existing customers the easier it can be to keep them happy and coming back by providing the products and services they’re looking for. The information you gather can also be used to help find new customers similar to the ones you have. It’s Marketing 101.
Lucky for you, your business uses liability waivers! So not only is your business legally protected but you have access to all of that valuable demographic data that was completed on the waiver. Even luckier for you, your business uses Smartwaiver so with just a couple of clicks you can know things about your customers like:
- How old are they?
- How did they hear about your business?
And so on…
If you’re looking for a quick overview of your data you can view your Smart Trends stats which are presented in easy-to-read graphs and charts.

But if you want to dig a little deeper and segment your participant list you can download the data as a CSV file by clicking on the Export Your Data button in your account. Once downloaded simply open the file in a spreadsheet program like Excel or Google Spreadsheet and sort the columns of data you'd like to segment.
Example 1: By Zip Code
If you ask for your participant's physical address on the waiver, including the Zip Code...

...you can segment their responses by sorting the Zip Code column in the spreadsheet.

Once sorted, you can create a new targeted email list, upload it to your email marketing software and then send out geographic-specific email offers like a "locals only" special.

Example 2: By Repeat Visit
You can segment your participant list by the number of times they’ve Checked-in at your location. Once sorted you can create a new email list, upload to your email marketing software and then send an email with a loyalty offer to those most valued customers.

Example 3: Custom Question
If you offer multiple activities at your facility, you can include a custom question on the waiver, like, “Which activity are you participating in?”
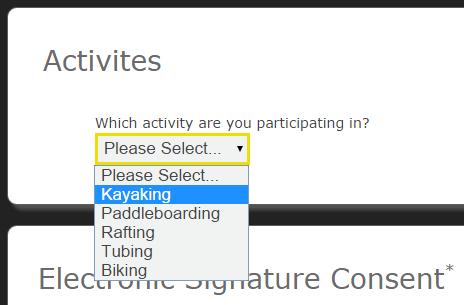
You can then sort the responses in the CSV file, create a new email list to upload to your email marketing software and then send out an email offer that pertains only to the activity they purchased.

These are just a few examples of what's possible with the data you're collecting. With Smartwaiver you can include an unlimited number of custom questions on your waiver so the customer data possibilities are endless! As always, we're happy to help you set up and edit your waiver and custom questions for free.
Note: Be sure the email address field is included on your waiver and that participants have "opted-in" to your permission based marketing list before sending to email addresses that are coming from your digital waiver.


